HAL Notify via Mailchain
This tutorial shows you how to send HAL notifications via an authenticated Mailchain webhook to any EVM-address, ENS name or Unstoppable domain.
Solution Overview
At the end of this tutorial, you will have built an Express App, that exposes an API to send HAL notifications via Mailchain to any EVM-address, ENS name or Unstoppable domain. You will create on-chain event notifications in HAL Notify, and configure HAL to use your API as a webhook for sending POST requests to. Your app will use the Mailchain SDK to send the notifications and Bearer tokens to authenticate incoming requests. In most cases, you would add a route to an existing Express App, but for this tutorial, you'll create a new app.
Prerequisites
To complete this tutorial, you need to first:
- Download and install NodeJS.
- Install npx by running
npm install -g npx. - Create a new Mailchain account for development and testing purposes.
- Sign in or Create a HAL account
- Ngrok account with Ngrok installed on your machine. Ngrok will be used to expose the localhost to the internet in order to be accessible for the webhook, but feel free to use your own solution (e.g. gitpod.io) to expose the localhost for testing purposes.
Tutorial
Step 1: Create a new app that sends mail via the Mailchain protocol
1.1. New API Server
You'll create a new Express app that exposes an API, the simplest way to do that is with a generator that creates an Express App structure. There are various express generators, for this tutorial you'll use typescript-express-starter.
To begin, open a terminal window on your computer and run:
npx [email protected] mailchain-hal-webhook
typescript-express-starter will ask you for some details:
- Accept the
defaulttemplate, by pressingenter. - Press
nwhen asked to update to the latest packages, this guarantees this tutorial completes successfully. - Press
ywhen asked toremoved duplicate packages at npm.
typescript-express-starter can take a while to create a new project as it's installing npm packages. Once completed typescript-express-starter will confirm it's status:
? Please select the template you want default
? Do you want to update all packages in the node_modules directory and dependency ? No
? Do you want to Used to removed duplicate packages at npm ? Yes
[ 1 / 3 ] 🔍  copying project...
[ 2 / 3 ] 🚚  fetching node_modules...
[ 3 / 3 ] 🔗  linking node_modules...
─────────────────────────────────────────
✔ Complete setup project
Your Express App is now created.
Check you can start your mailchain-hal-webhook app in development mode by running:
cd mailchain-hal-webhook && npm run dev
The output should look like:
[nodemon] 2.0.20
[nodemon] to restart at any time, enter `rs`
[nodemon] watching path(s): src/**/* .env
[nodemon] watching extensions: js,ts,json
[nodemon] starting `ts-node -r tsconfig-paths/register --transpile-only src/server.ts`
info: =================================
info: ======= ENV: development =======
info: 🚀 App listening on the port 3000
info: =================================
This confirms that the app started correctly and can be accessed via http://localhost:3000.
Press ctrl+c, this will stop the Express App.
1.2. Mailchain SDK
Mailchain SDK is the easiest way to use Mailchain, it deals with all of the cryptography details for you.
Installation
To install the Mailchain SDK you need to run an npm command in the base directory of your project mailchain-hal-webhook. If you are following Step 1, you should already be in this folder. Otherwise, open up a terminal window and navigate to your mailchain-hal-webhook folder.
Install Mailchain SDK using npm:
npm install --save @mailchain/sdk
You have now installed the Mailchain SDK and are ready to configure it.
Open mailchain-hal-webhook in your favorite code editor. You'll see it contains example services, controllers, routes, etc. Later you'll extend this functionality.
Configuration
The Mailchain SDK needs to be authenticated with your Secret Recovery Phrase to send messages.
Get the Secret Recovery Phrase for your test and development Mailchain account.
Open .env.development.local in your editor, and add a new line to the bottom SECRET_RECOVERY_PHRASE=enter your secret phrase here.
Replace enter your secret phrase here with your Secret Recovery Phrase and save the file.
After your .env.development.local should look similar to this:
# PORT
PORT = 3000

SECRET_RECOVERY_PHRASE=enter your secret phrase here
In your terminal window run, npm run dev from the root directory of your mailchain-hal-webhook app. You should get a response similar to below:
info: =================================
info: ======= ENV: development =======
info: 🚀 App listening on the port 3000
info: =================================
This means is successfully started and listening on port 3000.
NOTE: nodemon automatically restarts your API when file changes are detected. However, it doesn't pick up changes to .env.development.local so you need to restart the server manually by pressing ctrl + c and running npm run dev. You'll only need to restart the app when changing the SECRET_RECOVERY_PHRASE setting.
1.3. Create a service for sending mail
Express uses services to perform tasks, in this case sending mail using the Mailchain SDK. The service will send messages using the account based on the SECRET_RECOVERY_PHRASE environment variable.
MailService will perform the following actions:
- Initialize the Mailchain SDK using the
SECRET_RECOVERY_PHRASE. - Set the
fromaddress to the currently authenticated user. - Send mail using the Mailchain SDK.
Inside src/services/ create mail.service.ts and copy the code below into it.
Change the to: to the address or addresses you want to receive the notifications, making sure you use the fully qualified mailchain address, for example:
[ '[email protected]' ][ '[email protected]' ][ '[email protected]' ][ '[email protected]' ]- for more examples, see address formatting
import { Mailchain, SendMailParams } from '@mailchain/sdk';

class MailService {
    async send(params: SendMailParams) {
        // use the environment variable to provide your secret recovery phrase
        const secretRecoveryPhrase = process.env.SECRET_RECOVERY_PHRASE;

        if (secretRecoveryPhrase == null) {
            throw new Error('You must provide a secret recovery phrase');
        }
        const mailchain = Mailchain.fromSecretRecoveryPhrase(secretRecoveryPhrase);

        if (!params.from || params.from === '') {
            // set the from address to current user if not provided
            const currentUser = await mailchain.user();
            params.from = currentUser.address;
        }

        return await mailchain.sendMail(params);
    }
    async halWebhook(params) {
        const msg = {
            to: ['[email protected]'],
            from: params.from,
            subject: 'Hal Notification',
            content: {
                text: params['Body'],
                html: '<div>' + params['Body'] + '</div>',
            },
        };
        return await this.send(msg);
    }
}

export default MailService;
Remember to save mail.service.ts after pasting the code.
1.4. Create mail controller
Controllers manage the incoming HTTP requests and send the necessary data to the correct service.
MailController will perform the following actions:
- Pass the HTTP request body to the send service.
- Return a response to the request with the
statusfield from the Mailchain SDK send result.
In your editor create mail.controller.ts in the src/controllers/ folder. Copy and paste the code below into it.
import { NextFunction, Request, Response } from 'express';
import MailService from '@services/mail.service';

class MailController {
    public mailService = new MailService();

    public postMail = async (req: Request, res: Response, next: NextFunction): Promise<void> => {
        try {
            const sendResult = await this.mailService.send(req.body);

            res.status(200).json({ status: sendResult.status });
        } catch (error) {
            next(error);
        }
    };
    public postWebhook = async (req: Request, res: Response, next: NextFunction): Promise<void> => {
        try {
            const sendResult = await this.mailService.halWebhook(req.body);

            res.status(200).json({ status: sendResult.status });
        } catch (error) {
            next(error);
        }
    };
}

export default MailController;
Remember to save mail.controller.ts after pasting the code.
Step 2: Setup authentication using Passport and the bearer scheme.
2.1. Install passport
Passport authenticates API requests. In this case Passport will authenticate whether a POST request has come from HAL.
To install passport and passport-http-bearer libraries and types, open a terminal window and navigate to the root directory of your code, then run:
npm install --save passport passport-http-bearer
npm install --save--dev @types/passport @types/passport-http-bearer
passport provides multiple different authentication strategies for APIs and works with Express. passport-http-bearer configures Passport to use the bearer strategy for authentication.
2.2. Generate authentication tokens
Your API will use the bearer authentication scheme to authenticate requests. You'll need to create a list of known tokens and provide them to the application. Passport then looks at the request token and searches for it in the known tokens list.
The format for a Bearer authentication header is:
"Authorization: Bearer {token}"
NOTE: The value of the token can be anything, usually a random generated string that is meaningless to the client. Random values make for easy authentication but since the request is not signed. Care must be taken to properly protect the token as anyone with the token can make requests.
Generate tokens
You need to use a secure random generator to safely generate bearer tokens. The latest version of openssl implements a secure random generator that generates and formats random values of any length.
Open a terminal window and execute the following command:
openssl rand 32 -hex
Try running it again, notice that each time you run it you get a different unique value.
2.3. Provide tokens to app
Your app will extract the bearer token from the HTTP request Authorization header. It will then look for the supplied bearer token in a list of known tokens. If it finds a match then the server will authenticate the request.
The known tokens are stored in the BEARER_TOKENS environment variable. BEARER_TOKENS is a comma separated list, meaning you can join multiple outputs from generate tokens with commas to create a list of tokens for you API. Paste the following command in your terminal window to quickly generate 3 random tokens separated by commas:
echo BEARER_TOKENS=$(openssl rand 32 -hex),$(openssl rand 32 -hex),$(openssl rand 32 -hex)
Open .env.development.local in your editor, and copy the output of the above command to the bottom of the file:
After your .env.development.local should look similar to this:
SECRET_RECOVERY_PHRASE=enter your secret phrase here

BEARER_TOKENS=token-1,token-2,token-3
2.4. Authenticate application
Your application will use passport to authenticate requests looking for the bearer token.
The new additions to the app.ts code:
- Import
passportandpassport-http-bearerdependencies. - Calls
initializeAuthenticationfrom the constructor. initializeAuthenticationuses the bearer strategy with passport and checks tokens withBEARER_TOKENSenvironment variable.
In your editor open the existing app.ts file in the src/ folder. Replace the existing contents by copying and pasting the code below into it.
import cors from 'cors';
import express from 'express';
import helmet from 'helmet';
import hpp from 'hpp';
import morgan from 'morgan';
import passport from 'passport';
import { Strategy } from 'passport-http-bearer';
import { NODE_ENV, PORT, ORIGIN, CREDENTIALS } from '@config';
import { Routes } from '@interfaces/routes.interface';
import errorMiddleware from '@middlewares/error.middleware';

class App {
    public app: express.Application;
    public env: string;
    public port: string | number;

    constructor(routes: Routes[]) {
        this.app = express();
        this.env = NODE_ENV || 'development';
        this.port = PORT || 3000;

        this.initializeAuthentication();
        this.initializeMiddlewares();
        this.initializeRoutes(routes);
        this.initializeErrorHandling();
    }

    public listen() {
        this.app.listen(this.port, () => {
            console.debug(`=================================`);
            console.debug(`======= ENV: ${this.env} =======`);
            console.debug(`🚀 App listening on the port ${this.port}`);
            console.debug(`=================================`);
        });
    }

    public getServer() {
        return this.app;
    }

    private initializeAuthentication() {
        passport.use(
            'bearer',
            new Strategy((token, done) => {
                const { BEARER_TOKENS } = process.env;
                if (!BEARER_TOKENS) {
                    return done(new Error('server has no bearer tokens'));
                }

                const authenticated = BEARER_TOKENS.split(',').some((v) => token === v);
                if (!authenticated) {
                    return done(null, false);
                }

                return done(null, {}, { scope: 'all' });
            }),
        );

        this.app.use(passport.initialize());
    }

    private initializeMiddlewares() {
        this.app.use(
            morgan('dev', {
                stream: {
                    write: (message: string) => {
                        console.debug(message.substring(0, message.lastIndexOf('\n')));
                    },
                },
            }),
        );
        this.app.use(cors({ origin: ORIGIN, credentials: CREDENTIALS }));
        this.app.use(hpp());
        this.app.use(helmet());
        this.app.use(express.json());
        this.app.use(express.urlencoded({ extended: true }));
    }

    private initializeRoutes(routes: Routes[]) {
        routes.forEach((route) => {
            this.app.use('/', route.router);
        });
    }

    private initializeErrorHandling() {
        this.app.use(errorMiddleware);
    }
}

export default App;
Remember to save app.ts after pasting the code.
Step 3: Wire up the API
RESTful API's are designed around paths and methods, in Express these are created in the src/routes folder.
The API is called by clients using HTTP. The HTTP interface is modeled as a RESTful API making it familiar for developers and easy to discover.
You'll create an additional HAL webhook route that accepts HAL notification parameters. The route will use the sendMailfunction you created above.
3.1. Create HAL webhook route
halWebhookRoute performs the following actions:
- Adds the
sendpath. - Listens for a
POST. - Route request to the mail controller.
In your editor create halwebhook.route.tsin the src/routes/ folder. Copy and paste the code below into it.
import { Router } from 'express';
import { Routes } from '@interfaces/routes.interface';
import MailController from '@/controllers/mail.controller';
import passport from 'passport';

class HalWebhookRoute implements Routes {
  public router = Router();
  private readonly _mailController: MailController;

  constructor() {
    this._mailController = new MailController();
    this.initializeRoutes();
  }

  private initializeRoutes() {
    this.router.post('/hal-webhook', passport.authenticate('bearer', { session: false }), this._mailController.postWebhook);
  }
}

export default HalWebhookRoute;
Remember to save halwebhook.route.ts after pasting the code.
3.2. Add route to server
Now HalWebhookRoute has been created, the final code change is to add HalWebhookRoute to the server.
The server code:
- Adds routes.
- Listens to incoming requests.
In your editor open the existing server.ts file in the src/ folder. Replace the existing contents by copying and pasting the code below into it.
import App from '@/app';
import IndexRoute from '@routes/index.route';
import HalWebhookRoute from './routes/halwebhook.route';

const app = new App([new IndexRoute(), new HalWebhookRoute()]);

app.listen();
Remember to save server.ts after pasting the code.
Now your app is ready to start accepting HTTP requests.
Step 4: Create a public endpoint
Run ngrok http 3000 in a terminal and copy the Forwarding value from the output, it will be something like https://012a-93-12-152-21.eu.ngrok.io. Leave it running so the webhook can be reached by HAL notify.
Webhook URL: Copy the Forwarding value from ngrok and add the route /hal-webhook to the end of it. It should look something like:
https://012a-93-12-152-21.eu.ngrok.io/hal-webhook
Step 5: Create your notification path in HAL
HAL provides no-code web3 infrastructure. HAL Notify makes it easy to implement web3 notifications which can be triggered by any EVM state change, smart contract, wallet and more. HAL supports multiple channels for receiving notifications, including sending to webhooks. In this case, HAL will use your API as a webhook and we will get the public endpoint from gitpod.
5.1. Configure your notifications in the HAL app
Create an account or login to https://app.hal.xyz/ and create a new workspace for your Mailchain notification path.
In the workspace, click ‘Create Notification’
Choose notification triggers
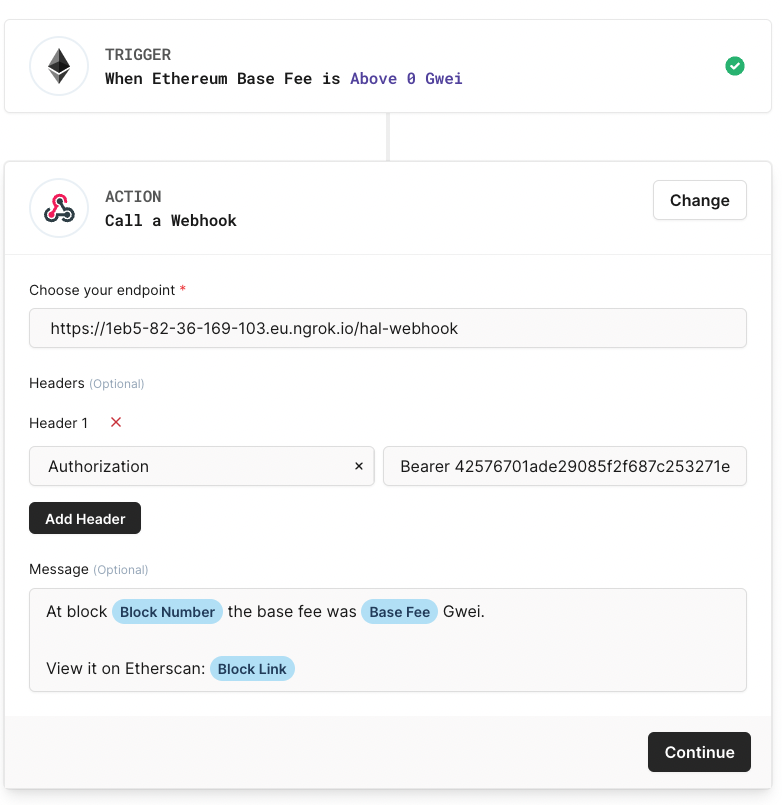
HAL provides a number of different triggers you can choose from, including base fee tracking, token purchase tracking and NFT floor price. For this example, we will trigger when Ethereum Base Fee is Above 0 Gwei, as this will give us a near-instant notification.
Connect webhook
Select the Action ‘Webhook: Send a POST request’.
Copy in the endpoint address with route that you created in the previous step.
Select Add Header:
- Header name: ‘Authorisation’
- Value:
Bearer token_1(Bearer followed by one of the tokens you copied intoenv.development.local)
It should look something like this:
Step 5.2. Testing
Now you can send your first notification.
Start your application:
npm run dev
Activate your notifications in Hal:
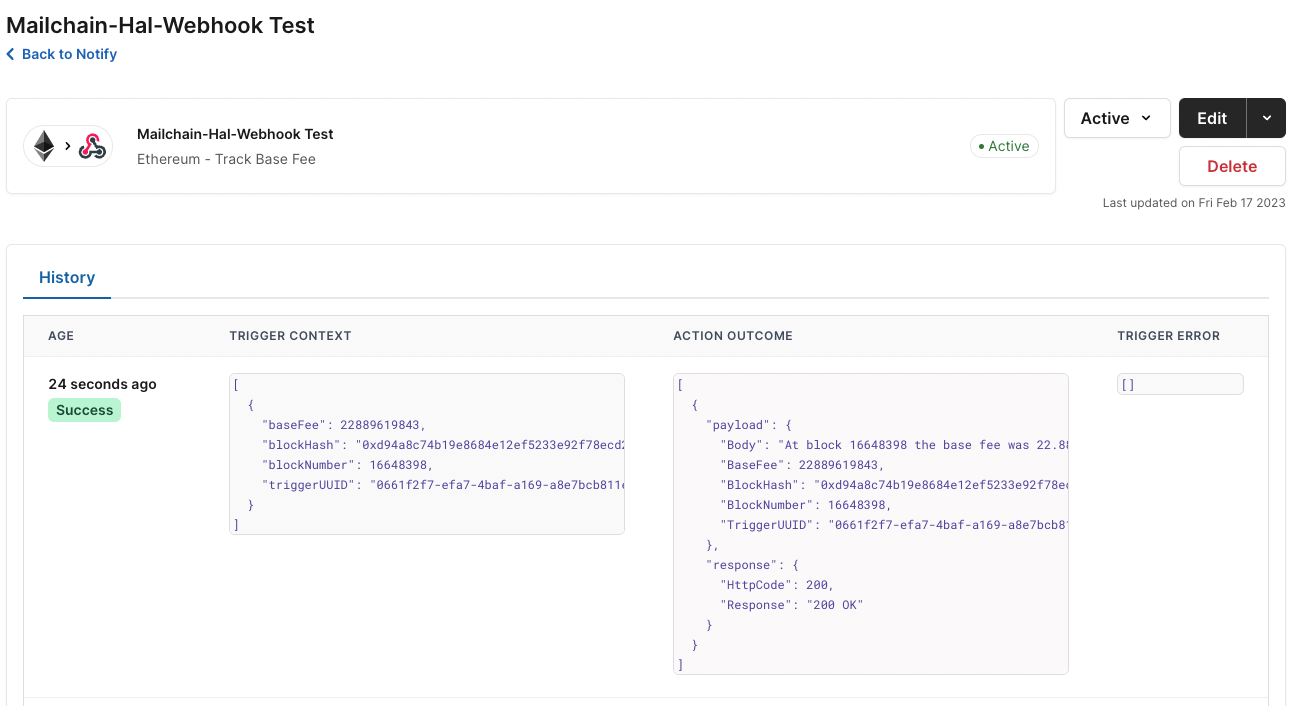
Open the Mailchain inbox you sent the notifications to:

Congratulations you’ve sent your first notification using HAL and Mailchain! 🥳